
I’ve got carrots coming out of my ears and more to pick still! So yesterday I processed carrots. I got about 2 to 3 pounds of carrots into each of these jars that are sitting on my counter fermenting.

Two quarts of carrots fermenting on the counter.
One was inspired by a dilly carrot canning recipe that came from Ball’s Complete Book of Canning. It included carrots, dill, red pepper flakes, and garlic. The other is carrots, a couple of turnips, with ginger, garlic, and scallions. The process I used for each concoction was the same, just with different ingredients. I just cut the carrots into matchsticks (with the help of my mandolin slicing tool), and put them in a bowl with a brine I mixed up of 4 cups water and 3 tablespoons salt (per batch). I let that sit overnight. The next day I drained the carrots, tested for saltiness (rinse if too salty or add salt if not salty enough) and then I mixed in the other ingredients.

Mixing up some dilly carrots.
Next I stuffed everything into a very clean quart jar. It’s amazing how much more you can stuff in a jar than you think! You want to pack it in tight to eliminate air bubbles. By the time my jar was packed I had squeezed enough liquid out of the carrots to cover the carrots. If your carrots aren’t all under water, smash them down even more! If they’re still not covered, add some of the saved brine. I used a wide mouth jar so that I can fit a jam jar with water over the top to keep all those carrots under water. I’ll let them sit on the kitchen counter for 4 or 5 days and then store them in the fridge. It’s amazing how much space I just freed up in my fridge!
I processed another five pounds of carrots in the canner using the unaltered dilly carrot recipe from Ball’s Complete Book of Canning.

Seven jars of dilly carrots!
These spicy dilled carrots are so yummy!! I learned a couple more tricks for this recipe this round too. I used to pick out my smallest carrots to pickle because then I get done with the putsiness of cleaning small carrots all in one shot. But this time, since I didn’t really have any small carrots to deal with, I used big carrots, which worked out nicely because you can cut your sticks uniformly and pack those jars a lot tighter! This time around I used 1/2 the amount of brine that I usually use because I was able to pack the jars so tight. Tip number 2 is to throw some of those dill flowers overtaking your garden mid summer and throw them in the freezer to use for canning dilly carrots and pickled beets in the fall. Works great!
After processing around 10 pounds of carrots yesterday I’ll have plenty of room for the rest of them in the fridge. I’m hopeful that this year I’ll have enough for fresh eating until spring!
Wow! Strawberry Hill is the land of large root crops! What a stupendous surprise to discover these giant roots have been lying undetected under the surface of the soil!

Potato harvest just from one plant–they’re huge!!
I don’t know how well you can see those beauties but a bunch of them are about 8 inches long and there are about 16 of them! Just from one plant.
The carrot harvest was equally impressive.

Big Beautiful Boleros

Peek-a-boo!
I give a lot of the credit for the chocolate cake soil I have at Strawberry Hill to Tom and Kerry who I inherited the plot from. Thanks guys!
Strawberry Hill was not a happy place to grow onions or garlic this year but the roots went crazy! Anyone else have that experience this year? And remember the bean house? I was pretty pleased with the shelling beans we used for it. I harvested them all about 10 days ago. They were dried out and easy to shell and tasted so much better than what you buy at the store. I cooked them in a tasty soup with carrots, kale, and farro, yum!
So the Hugel bed experiments at the cabin seem to be a success! Our squash patch is more prolific this year than it’s ever been. The vines have taken over the paths and are traveling beyond the confines of our fence up into the juneberry tree and out into the blackberry brambles.  This kind of vine growth isn’t atypical but the number of fruit per vine has gone far beyond the norm this year. Until it frosts I can’t be certain of the exact count since the vines have made it impossible to open the garden gate without breaking them, so stay tuned for that.
The question is, is this success due to the added water and nutrient retention of the hugel bed, increased pollinators due to the flowers we planted, and/or the additional sun getting to the plot due to the serious pruning we did this spring? Or most likely, a combination of them all. We’ll keep experimenting…

One Monster Butternut!
Other garden updates: I canned 27 cans of salsa this year with tomatoes from Brule River Farm and it felt great to be liberated from growing tomatoes for canning myself. As a result I will have an ample harvest of potatoes, beets, and potatoes from the community garden. Which also makes up for the weak harvest of garlic and onions. I have 2 gallons of lacto-fermented cucumbers and a gallon of kraut in the beer fridge with lots more cabbage yet to ferment. Lots of greens are still in the garden waiting to be blanched and put in my freezer too. Every fall I get to a point when I’m excited for everything to die. I’m not quite there yet but almost.

This post isn’t directly about gardening. But it has to do with my love for a place which is what first got me interested in gardening. Last week me and my kids spent a week at Wilderness Canoe Base, located on Fishhook Island, on Seagull Lake at the end of the Gunflint Trail. This is the place, more than any other, that has taught me what it means to really know a place, and what it means to be a part of a community. Since moving away from Fishhook Island on Seagull Lake, most of my life’s direction has been motivated by trying to truly know my place and to build a strong sense of community among the animals, plants and people that I share this place that I occupy on the planet.
I promised my poet friend, Scott James, who I lived on the island with, that I’d share a poem from the week I spent there with my kids. So here goes:

Feels good to be back at True North.
I lean against it to measure up my life today
against a promise I made to a younger me.
A promise to not forget what matters.
The notes of a younger me:
“Funny how nature can be so non-deliberately
scattered on the ground,
yet make such perfect sense,
create such beauty.
That’s what I hope for;
To be non-deliberately scattered
yet make sense,
create beauty.”
Fourteen years, a husband, 2 kids, a dog, and a mortgage later,
am I still in touch with that girl
who one summer fell in love
with a place,
a community,
the world?

My kids: the most tangible manifestation of what I value.
As they foraged for berry snacks in the woods,
caught and examined frogs, tadpoles, and leeches,
watched bumblebees pollinate a stand of fireweed,
scaled rock faces just to see what was around the corner,
and sat and observed in quiet “awe” a lightening storm in the distance,
I witnessed them falling in love with that place.
A place.
The world.
Affirmation that I haven’t forgotten.
Affirmation that they will grow up to recognize the order 
and the beauty
in the non-deliberate “scatteredness” on the ground.
So the bean house at the community garden has been about 50 percent successful. As you can see, the plants are successfully growing and making a wall of vegetation as planned.

As you also can see, there are no children playing in said bean house. There are a couple of reasons for that. Our weekly trip to the garden has coincided with Milo’s nap,
 and Sylva’s art class. So sadly the bean house has been sitting empty. And, as it turns out, the bean house makes a very affective heat trap in the afternoon. With the weather we’ve been having, it hasn’t been a fun place to hang out after 11 in the morning. Maybe next year I’ll make a bean house and plant some heat-loving tomatoes in it to take advantage of the micro climate.
So this spring I wrote a post about our improvements to our cabin garden which included: cutting poplars for more sun, adding more flowers for better pollination, and installing Hugel beds in order to increase water retention and microbial activity. It’s late July and these are the results.
The cutting didn’t do enough. We miscalculated how the angle of the sun would change from spring to summer. The plants are doing OK but they are still spindly this year as they reach for the sun. We have taken note of which trees shade the garden mid summer and have added another session of cutting to the “to do” list.
It is yet to be seen if the flowers we planted will improve germination. Not as many seeds as I hoped actually germinated. Next year I’ll try to transplant more flowers–transplants seem to have better luck there than seeds.
The Hugel beds seem to be helping. It hasn’t rained in awhile but when I stuck my finger in the soil it was relatively moist. So far the potatoes haven’t been attacked by potato beetles. Does that mean they are feeling more pest resistant due to a stronger team of microbes keeping the plants healthy and defending the potato plants from pests?

Squash Land!

Happy squash on the vine! Hopefully somebody pollinated this bad boy.
I’m a lazy gardener. I’m not a fan of digging. I’ll do anything I can to avoid breaking sod. Weeding? Hate it. Planting is tedious. I’m not one to be bothered with the chore of watering. In fact, I’ve avoided watering my community garden for the last 5 years. I did water it this week just because I’m feeling so caught up due to my kids getting older and more helpful, and the spring starting so relatively early.
What do I like about gardening? The satisfaction is so tangible. You start with a handful of teeny tiny little seeds and end up with pounds and pounds of food. Food. This most basic of needs. The stuff that makes our brains and bodies think and move. To be a producer of food, rather than a consumer of food, I get a break from the never ending negotiations that go on in my head where I ponder questions like: Does this company treat their animals and workers well? Can I get this product from a local producer? Should I buy apples from New Zealand? How can I afford to buy the product that aligns the most with my values this week? This food that I grow in my garden—it’s unequivocally better for my health, my kids, wildlife, and my pocket book, than anything our economic system has to offer me as a consumer. And for that, I’ll gladly slog my way through all the garden chores.
But like I said, I’m lazy. That’s why my quest in the garden has always been to find a way to grow more food with less work. This quest has been the impetus for numerous experiments in the garden. Like a mad scientist, every year I’ve tried something different in an effort to grow more with less work. And as I read, learn, and experiment, I’ve come to see the importance of “the little guys.” If we can make the bacteria, fungi, nematodes, protozoa, worms, and arthropods in the soil happy, they will do a lot of the work for us.
I had an understanding of this when I went to establish my first garden bed in my yard. I decided to double dig it, which involved digging trenches 2 feet deep and incorporating a foot of compost in with the clay. I knew this would improve upon the environment for “the little guys” because it incorporates more air in the soil for them to breathe and move around in, enhances water retention, and supplies them with more food, in the form of the organic matter in the compost. The end result was pretty good but it was tons of work, especially because my yard is clay. I never would have got around to establishing four more garden beds in the yard if I thought double digging was the only way.
Next I tried sheet mulching. This is a process of establishing a garden bed by laying down layers of different organic material. It’s like building a compost pile spread out across your entire garden bed. It’s basically creating an all-you-can-eat buffet for “the little guys.” And the happy by-product of their feasting is that they’re processing the organic material into rich, fluffy soil that’ll make your veggies happy, all without digging!
The downside of sheet mulching for me was that although it was easy to get my hands on vast quantities of cheap, or even free organic materials for the layers (like cardboard, leaves, grass clippings, straw, compost, etc.) it required a lot of work to gather them all together. Being the lazy gardener that I am, I started looking for a better way.
Then I heard about Hugelkultur. This is a method of building a garden bed where you put down layers of organic materials, similar to sheet mulching, except with Hugelkultur, you can incorporate whole logs at various degrees of rotting, and tree branches, into the bottom layers of the bed. The bed ends up having a lot of height (mine have ended up being 2 to 3 feet tall), providing more planting space per square foot. Incorporating organic materials that are chunkier and take longer to break down keeps the beds from compacting, (eliminating the need to dig and disrupt soil structure,) improves water retention, and provides a longer-term supply of food for “the little guys.”
My experimenting began in an already established garden bed. I laid out where I wanted my beds and dug out about a foot of soil. Yes, here I am digging again but I wasn’t breaking sod and a Hugel bed does not need to be turned over or tilled every year so in the long run: less work! I gathered lilac bush trimmings, rotting logs, and twigs and sticks and threw them down in the dug-out beds as a first layer. On top of that I emptied out my compost bin to make room for this summer’s yard waste, which was about half way to compost. I wasn’t worried about weed seeds from this because it would be buried under a good two feet of weed-free organic materials which I wouldn’t be turning over. Next I added a layer of sod from my days of double digging. On top of that I put a thick layer of over-half-way-composted straw from my straw bale gardening experiments. And Finally, I covered it all up with the soil I dug out of the beds to start off with. I seeded lettuce, greens, radishes, and turnips and lightly mulched it with straw.
Almost two months later the beds are looking good. The beds have settled quite a bit but the plants look happy. I’m up to my eyeballs in the greens, lettuce, radishes and turnips I’m currently harvesting from the beds to make room for the growing squash, brassica, and bush bean plants.

Densely-planted brassicas mixed in with the lettuce and greens.

Squash and bush beans interplanted with lettuce and greens.
To learn about Hugelkultur from our local experts, check out Spirit Mountain Farm: http://www.spiritmountainfarm.org.
The books that inspired my experiments:
Teaming with Microbes by Jeff Lowenfels and Wayne Lewis
Sepp Holzer’s Permaculture by Sepp Holzer
Edible Forest Gardens by Dave Jacke
A lot has changed in the week since we last visited Strawberry Hill. Carrots and beet seeds have germinated and are ready for thinning. Potatoes plants are popping through. The pole beans and sunflowers that will make up,the wall for the garden hideout for the kids have germinated and begun to fill in.

Pole beans have germinated!
The there were only two sad-looking…”specimens” at the garden today. The first one was this guy:

He’s so cute when he’s mad!
The second one was my beautiful cabbage transplants with my special-0rder seeds for a variety especially good for sauerkraut. The flea beetles found this variety especially good too. My garden neighbors suggested a talcum powder dusting. I also made an effort to cover the plants with Remay but those pesky beetles were hiding in the soil already waiting to pounce.

Flea beetle damage.
A daily dusting might have done it but my lack of proximity to the garden did not allow. I seeded a short season variety today to replace the devoured plants. We’ll try again.
It feels great to be waking up from the fog of parenting infants and toddlers. Sylva is 5 and Milo is 2 ½ now. Milo is still a toddler, but old enough now to get around the garden on his own and to understand me when I say “please don’t walk on the onions!” Sylva is old enough to help reinforce to her brother rules like “walk in the path, not the bed.” She’s also old enough to provide entertainment for Milo. Which makes time at the garden sooo much more productive for me.
For the past 5 years projects have been on hold. Gardening has been a practice in letting go: letting go of the notion that a garden should be weed free, letting go of the idea that one must water her garden. In fact, last week was the first time I watered my community garden since Sylva was born. (In my defense, my first experience growing food was working on a farm and farmers don’t water in all of their seeds so I figure I don’t have to either. I still get good, although probably not optimal, production. My theory on watering though is for another day). Having the time and willingness from the kids to stay and water the garden– which is no small task at Strawberry Hill where a hose runs through the woods to the hydrant half way down the block– was a sure sign to me that the fog had lifted.

Kids enjoying a snack at Strawberry Hill.
Oh yes, there have been numerous signs that the fog has lifted. So many of the projects that I’ve been putting off for another year, happened this year. At the cabin garden we cleared away more trees so our garden could get more sun. We delivered a trailer full of compost and dug Hugel beds to improve soil quality at our cabin in sand country. At home, I dealt with the troublesome bed where the roots from the maple tree next door always out compete any veggies I try to plant. I dug some super-raised beds (Hugel style) that will hopefully keep the maple tree roots at bay. At Strawberry Hill everything is actually planted already. I’ve even de-weeded the grassy edge of my plot by the fence. And every year since Sylva was born I’ve attempted to create a little shady hideout for her using some trellises that pole beans could twirl around. It’s always been a well-intentioned but poorly executed plan because time has been limited, storage crops are of a higher priority at the community garden, and the project gets the marginal land near the fence. But not this year. I cleaned out the marginal area and made a Hugel bed in the shape of a half donut. The two corners of the donut have tripods set up for some pole beans. Sunflowers are planted to fill in the space between the tripods and the rest of the bed has been seeded with flowers and dill. This year my execution on “the hideout” promises to deliver!

The kids crouching in what will soon grow into their garden hide out.
Hopefully the Hugel beds will too because I seem to have used this strategy as a solution for most everything. Stay tuned to see how it goes!

That’s what my neighbors were calling me as they peered out their windows and walked their dogs past our yard. I’ve been reading Sepp Holzer, the “Rebel Farmer” again. So I’m trying another Hugelkultur experiment. This time in the front yard. Hugelkultur is a method of making raised beds, developed by Sepp Holzer, that’s kind of like sheet mulching except that you use logs and branches as the base layer and the beds end up being much taller. So I decided to try some more experimenting in the garden where I had my two-year-old straw bales (that I grew tomatoes in last year), and my potato patch. I had eight straw bales in that garden in the late stages of decomposition. I raked that all off the bed and marked out two L-shaped beds. I dug out the top 8 inches or so of soil from those two beds and made a pile.

The straw and soil layers for the Hugel Bed.
I then took some pruned branches from the lilac bush, some pine cones from the spruce tree and some other too-bulky-for-the-compost-pile materials I had around. I laid that material down in the two beds. I covered it with some sod I had sitting in a pile from previous projects.

Branches, brush, and sod layers.
Then I added a layer of food scraps and straw that was about half way to finished compost. Shoveling moldy grapefruit and rotting squash skins from my wheelbarrow into my front yard is the part that earns me the label “Crazy Garden Lady.” Every time I do it I feel this urgency to quickly cover it up before the nose of some neighbor dog detects stinky compost-pile goodies and has a snack, the evidence of which appears a few hours later on the neighbor’s carpet. The only dog that I’ve caught in the act has been my own. After cleaning up the evidence she left behind, in the interest of neighborly relations, I’d like to keep it that way. To cover up the stench of rotting food scraps, I threw on a thick layer of that two-year-old, very decomposed straw. On top of that I laid down the soil from the pile I had just made. The beds ended up being about three feet high with the sides being at least at a 45 degree angle, per Sepp’s recommendation. Sepp suggests seeding them right away while the soil is nice and loose so Sylva and I gathered together all of our lettuce, greens, radish, and spring turnip seeds that were more than two years old, mixed them together, and sprinkled them all over the two beds. Salad goodies will be the first round of succession before I plant the squash crop in them in June. The final touch was a light mulch of straw to keep in the moisture and prevent run off in a heavy rain. We’ll see what comes up!

The seeded beds!
I love the idea of Hugelkultur because it doesn’t require me to purchase anything and it allows me to incorporate a lot of organic materials that tend to pile up in the yard because they don’t work well in the compost pile. The height of the beds can have the affect of creating microclimates. I’m hoping the height will prevent the problem I have with invading roots from a close-by Maple tree that out-competes the veggies I plant for water and nutrients. While Hugel Bed construction was underway there was a lot of other things going on as well. I discovered a mole that was living in the compost pile. The kids were captivated. They spent a good half hour just watching it wiggle and worm around in the soil. A few hours later when we went to look for him again we found him “sleeping” in the same spot we left him. After some observations, and a little poking, the mole was declared dead.

Sylva and her mole friend.
We hypothesized about what did her in. Maybe someone accidently stepped on her. Maybe she was already sick. Maybe she missed her family and so she died. This all was of little concern to Milo but Sylva decided to put her in a Tubberware container with some compost and bleeding heart flowers placed ceremoniously beside her and wait to see if she would come back to life. At some point Sylva was able to accept that her little mole friend was not coming back, because she completely forgot about her and hours later I found her body in a sealed Tupperware container baking in the sun. When I asked Sylva to do something with her, she said “sure” and unceremoniously tossed her back in the compost pile to eventually fertilize the garden. Besides Mrs. Mole, I had two other successful attempts at keeping the kids occupied so I could do the garden work. Attempt number one: big cooler + water. It’s true, kids need to play with water. It was not a warm day today. I don’t even think it hit 50. But the kids were playing with the rain barrel water, getting soaked of course, and loving it. It started with me asking them to help me water my beds. At first they dutifully filled their watering cans and watered my beds. But then they decided that was too much work and they just wanted to play with the water from the rain barrel. So in an attempt to distract them from emptying my rain barrel and flooding out the garden, I got out the big cooler that we used to chill drinks at the birthday party last weekend (which still had water in it) and suggested they play with that water. They thought that was a great idea and started making “compost stew.” They threw in compost, dandelions, chives, sticks, wood chips, etc. That kept them busy for over an hour!
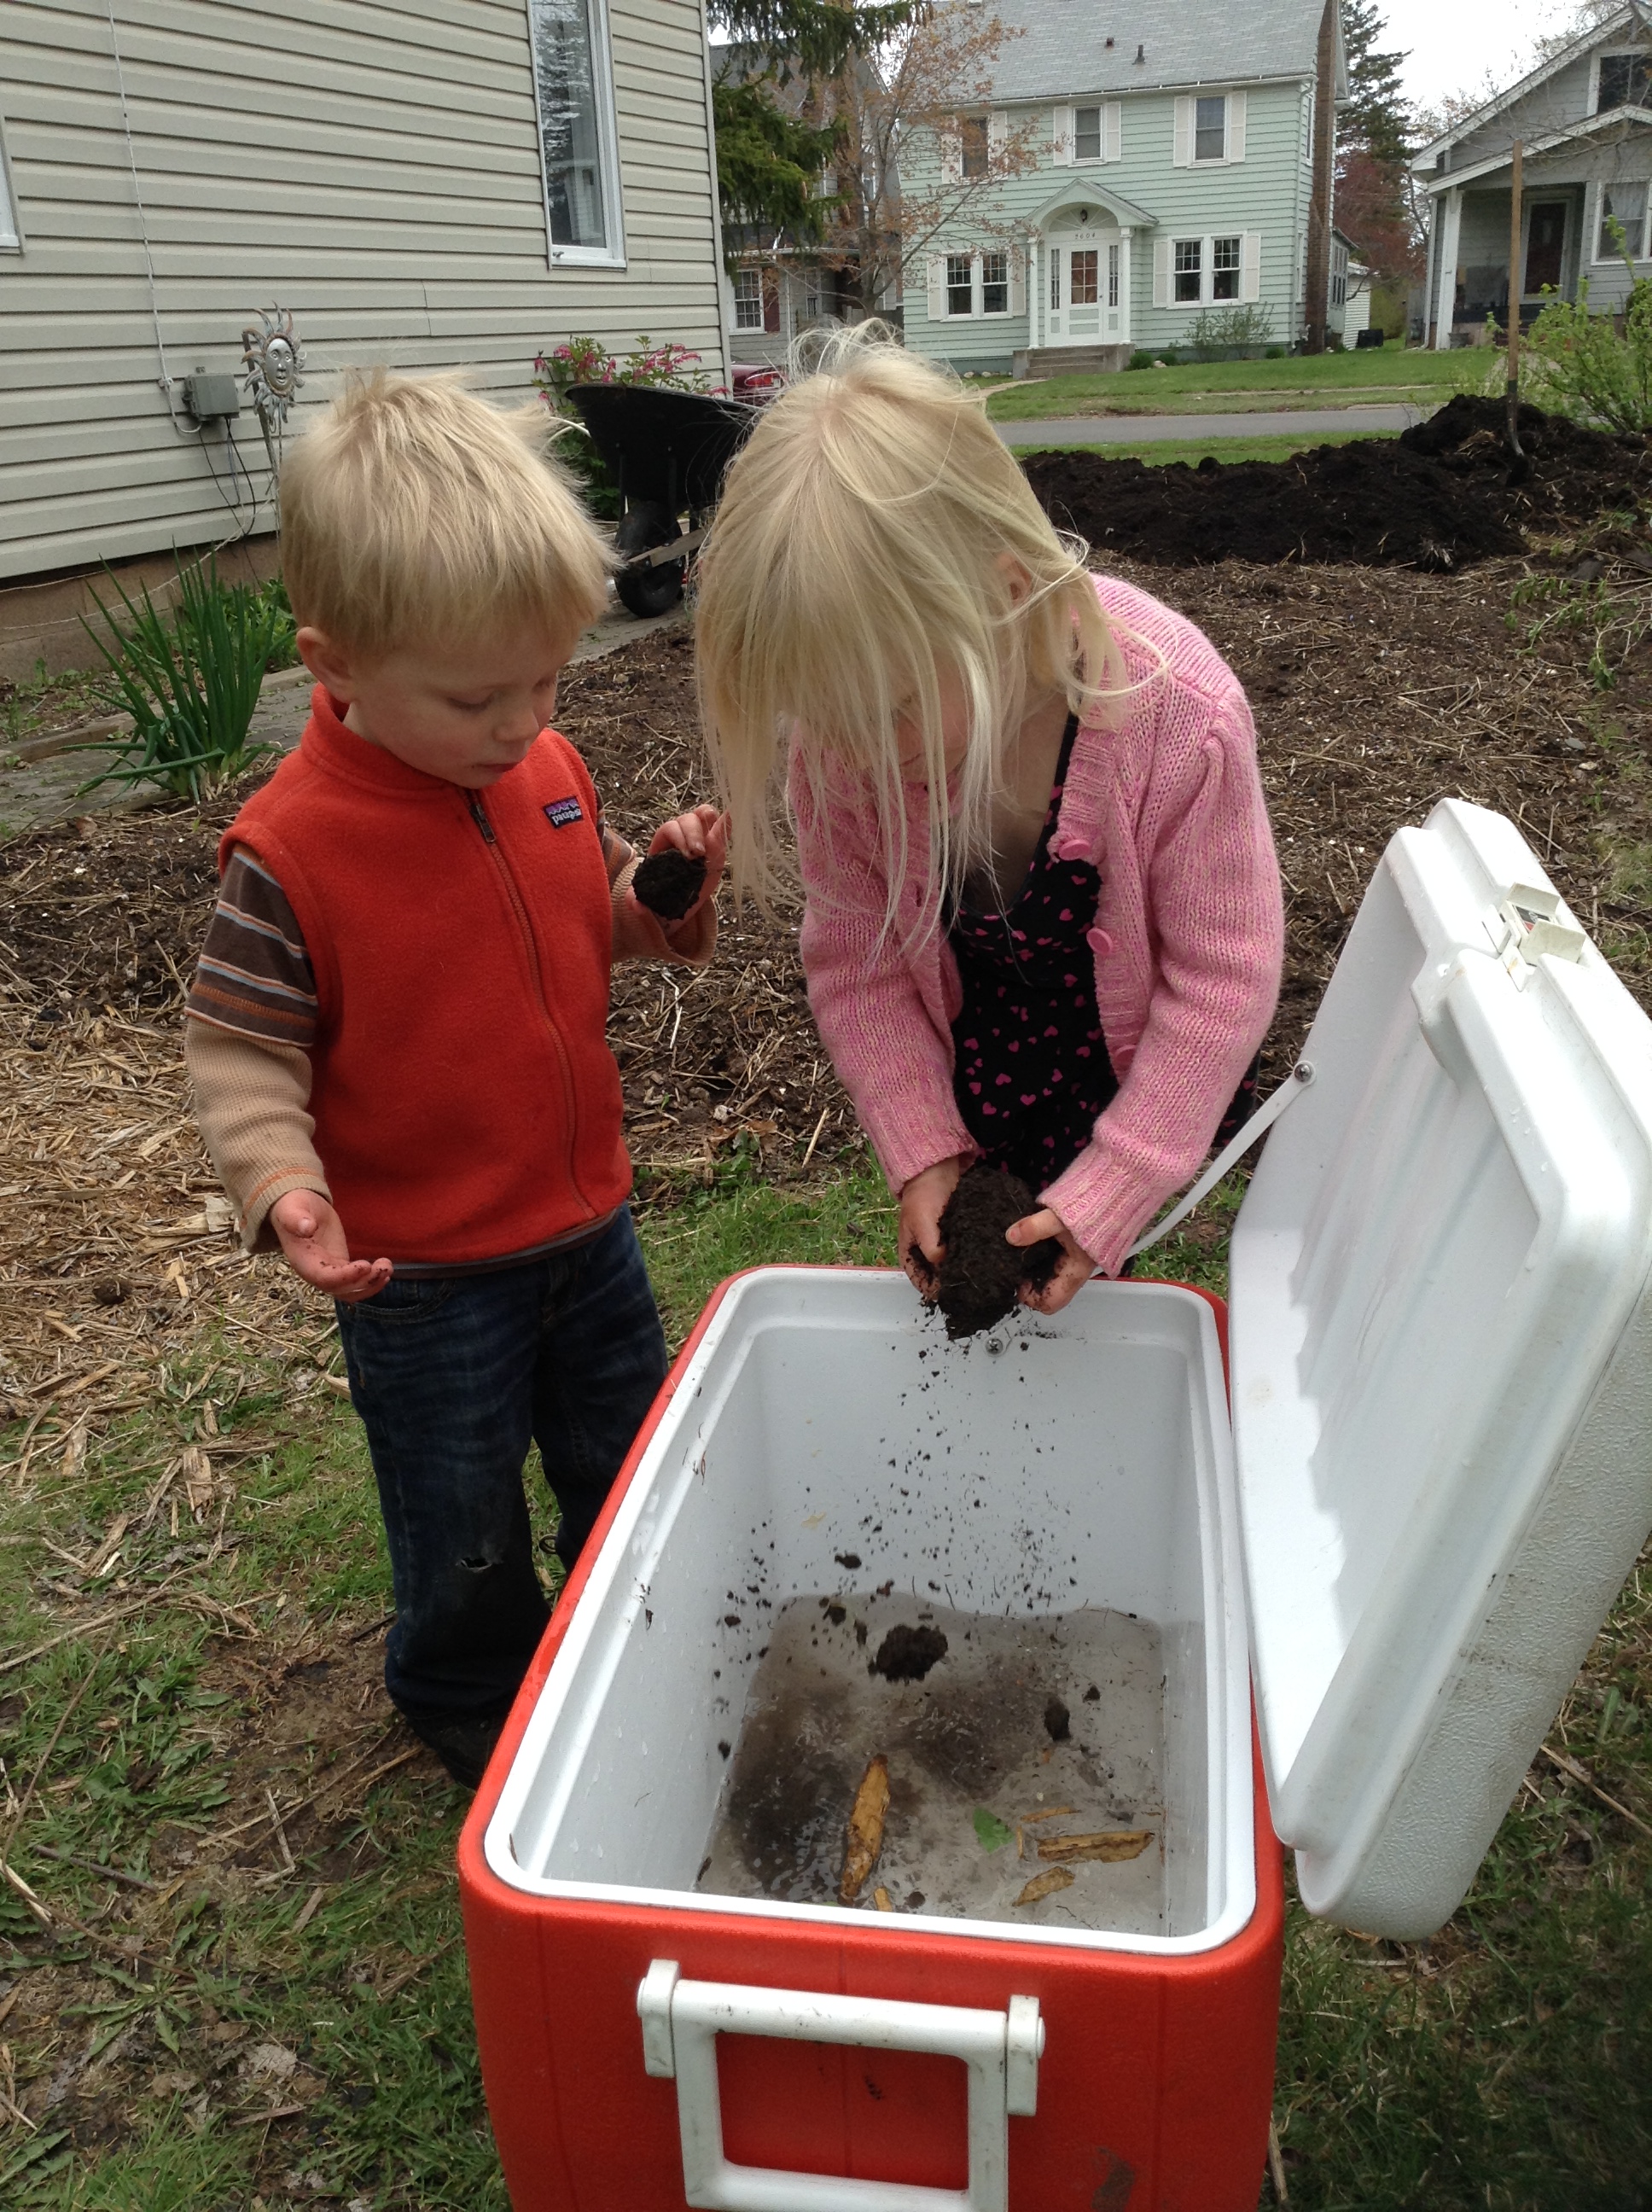
Compost Stew!!
Attempt number two: community garden camp out. Pitching a tent and bringing the sleeping bags to the community garden worked perfectly to get the kids to go along with my agenda of having a gardening marathon today.

The tent at Strawberry Hill.
At the end of the day, I’m feeling so satisfied that I spent the whole day outside, my body is tired, and my kids had fun. We all got some fresh air, exercise, and quality time together. Tomorrow is Mother’s Day. Scott won’t be around to make me breakfast because he’s gone on a canoe trip (it’s fishing opener). But Sylva insists she will be making breakfast for me tomorrow. After today I feel so refreshed and rejuvenated about life and being a mother. What more could I ask for?
